In our article Putting the “Unit” in MUnit — Shining Light on a Dark Art, we covered some of the common errors developers make when testing their applications.
In this article, we will delve into the art of testing Transforms, specifically. Frankly, this is where the lion’s share of a Mule project’s work is done, and yet it is the area most overlooked by inexperienced Muleys when writing MUnit tests.
The scenario
Let’s take the following simple flow as an example.
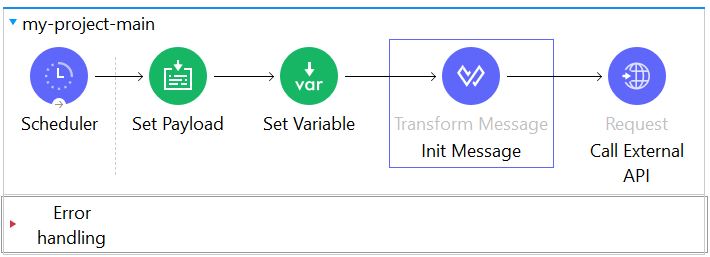
In the above flow, we perform the following steps:
- Scheduler initialises the flow at a set interval
- Set Payload sets the Flow’s payload to the current DateTime
- Set Variable creates a messageId by invoking Dataweave’s uuid() function
- Init Message is where the bulk of the work happens; here, we create our message body
- Call External API makes a call to some external service
The flow will finish up with whatever response the external system sends. Let’s assume, for the purposes of this post, that the external system sends either a 202 Accepted HTTP response, or an HTTP error code in the event that the external API processing failed for some reason.
As stated above, the bulk of our work resides in the Init Message transform component. We expect this component to produce an out put something like this:
{
   idField: "aa42ce55-1470-4db5-ade7-b1c935ac33e9",
   status: "Accepted",
   date: "2022-01-07 12:33:55"
}
… where:
- idField is the UUID generated in the Set Variable component
- status is a static value, always Accepted and
- date is a timestamp that matches the system datetime at time of execution, in the format yyyy-MM-dd HH:mm:ss
The Problem
The standard MUnit approach is to:
- Right-Click src/test/munit
- The click New | Munit Test
This brings up the MUnit Test Suite form:
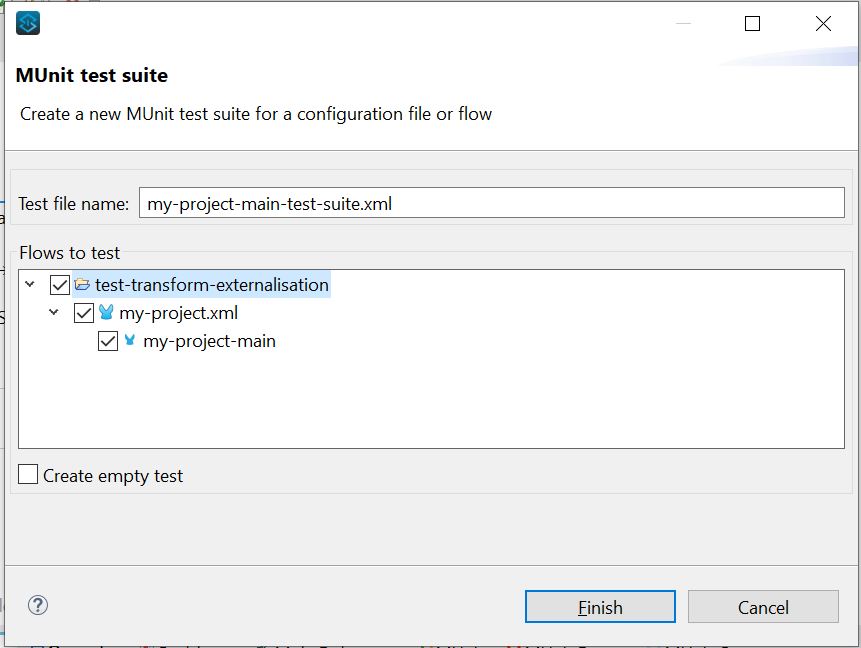
From there, you would :
- Select an appropriate Test file name for your Test Suite
- Check each of the flows you want your Test Suite to test. In this case, there is only one; my-project-main
- Click Finish
This generates the following flow, to which you can begin adding your Assertions.
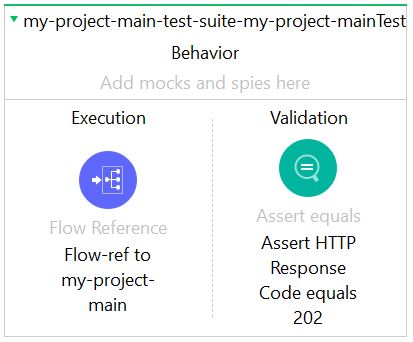
As we expect the external API to send an empty response with a simple 202 Created HTTP code, there aren’t many levers we can pull here. I created a simple Assert that validates the HTTP response code.
As it happens, this test fails as the external API actually sends a 200 OK.

Now what?
Frankly, there is no point running the above test. Testing this response from the external system is meaningless, as our process has no control over what that service returns. It could break, or change, for any number of reasons.
A 200 OK indicates that the external API accepted and processed our message, albeit with an unexpected response. We can reach out to the external team and let them know that it is not behaving as expected but all that proves is that we have written a test for their application — not ours.
Ideally, we would like to write an assert that validates whether the payload.idField matches vars.msgId. That would, at least, tell us something about the Request Body. However, this is no longer accessible as that payload is gone. It has been replaced by the empty response from the external API.
It would also be nice to confirm that the paylod.date value in our request matches the value in Set Payload, and that it is in the correct format. To do that, we need the ability to control the value coming out of that component. One might achieve this using a Mock for the Set Payload object. That would, at least, offer a degree of control over the message input. However, we are then faced with the same problem; the message created by the Transform component is no longer accessible from our test flow.
The Solution — Externalise the Transform
To solve the above issue, we need to externalise the Transform Component’s Dataweave script and test it in isolation. This is relatively straightforward. In fact, it is so straightforward that you can even retrofit these externalisations to the myriad of transforms in an existing project.
Step #1 — Externalise the SCript
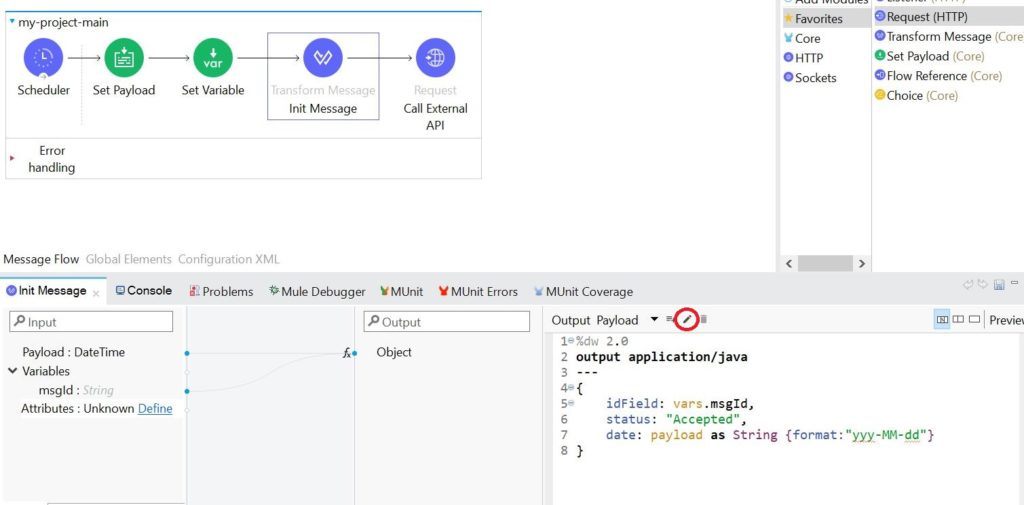
First, go back to to my-project-main flow, and click on the Init Message Transform:
Look at the script in the Init Message Properties window. In my project, the following script is already typed up in the bottom right-hand pane; ready to test. To simulate this, reproduce the above flow on your own instance of Anypoint studio and paste the code below into your Transform’s edit pane.
%dw 2.0
output application/java
---
{
   idField: vars.msgId,
   status: "Accepted",
   date: payload as String {format:"yyy-MM-dd"}
}
- Click the Edit icon (circled in red below).
This opens the Selection Dialog box where you would normally configure your target (payload | variable | attributes).
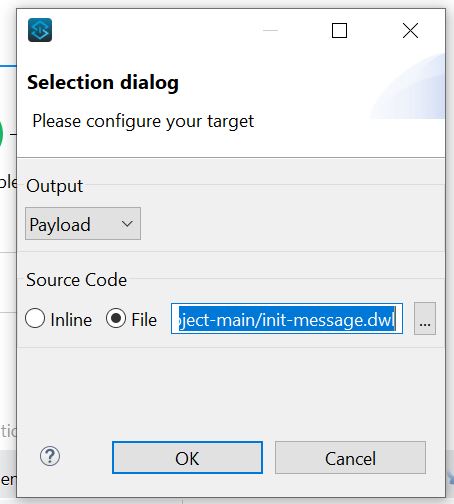
- Now, click the File radio button under Source Code. This tells the platform that you want your script to be file-based rather than inline
- Next, enter the file location (relative to src/main/resources)
- For maintainability, store all your Dataweave scripts in /transforms/<flow-name>/<transform-component-name>.dwl
- In this case, that means transforms/my-project-main/init-message.dwl
- Click OK
- Finally, Save your Configuration file
That’s it! To confirm, look in your Package Explorer in the left-hand pane of your IDE. Under src/main/resources you should notice your new directory structure and file.
![]()
If you open that .dwl file in a text editor, you will see a carbon copy of your original script; this is where your Transform component is now reading that script from. The good news is, you can now update that file directly from your Mule flow, just as you did when it was written inline.
Step #2 — Import Externalised script into an Munit test
- Right-Click on src/test/munit in your Package Explorer
- Then click New | MUnit Test
![]()
- Set Test file name to my-project-transforms-test-suite.xml
- Don’t check any items under Flows to test; you will not test any flows in this Test Suite
- Click Finish
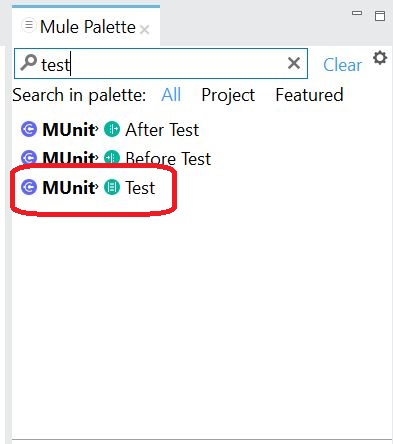
You should now see a blank canvass for your new test suite. Find a Test (Flow) component in your Mule Palette on the right-hand side of your screen and drag it on to your canvass
- Set Name to my-project-main-transforms-init-message-test
- Now drag a Transform component into the Execution block of your new flow
![]()
Next, you want to externalise this script. It would be nice, if you could just point it at your existing .dwl file. However, the IDE will pop up a warning that this will overwrite your existing script. Clearly that would be bad, so we will need to do a bit of fancy footwork to get the Mule to co-operate. Time to Whisper!
- Click the Edit icon, like you did in the main flow.
- Then select File under Source Code.
- Enter a dummy name (E.g. dummy.dwl). Just that; nothing else, as we will delete this file later anyway
Now your transform xml is in the correct structure.
- Open my-project.xml (your main flow with code)
- Right-click on Init Message transform and then click Go to XML
- Now copy the resource value from the code snippet, as shown below
<ee:transform doc:name="Init Message" doc:id="37d88419-8ee0-4fa1-aa5a-171008976e4f" >
   <ee:message >
      <ee:set-payload resource="transforms/my-project-main/init-message.dwl" />
   </ee:message>
</ee:transform>
- Return to your new Test Suite
- Right-Click on the Test Init Message Transform, then click Go to XML
You will see its definition, pointing to dummy.dwl
<munit:test name="my-project-main-transforms-init-message-test" doc:id="43c4bd79-9cee-4768-84ec-989027674e72" >
   <munit:execution >
      <ee:transform doc:name="Test Init Message Transform" doc:id="8a6577c7-747e-4c55-82c8-6d5a9893adff" >
         <ee:message >
            <ee:set-payload resource="dummy.dwl" />
         </ee:message>
      </ee:transform>
   </munit:execution>
</munit:test>
- Replace dummy.dwl with the target file location transforms/my-project-main/init-message.dwl
- Save your changes
- Then return to Message Flow view
- Click on the Transform component again
- Check the script in the bottom right-hand pane
Et voila! Your script’s code should automatically appear in the pane, just as you wrote it previously.
Step #3 — write the test
You may have noticed an Error notification when you created your new transform. This is because the script references variables that don’t exist in your Test yet. Let’s rectify that first.
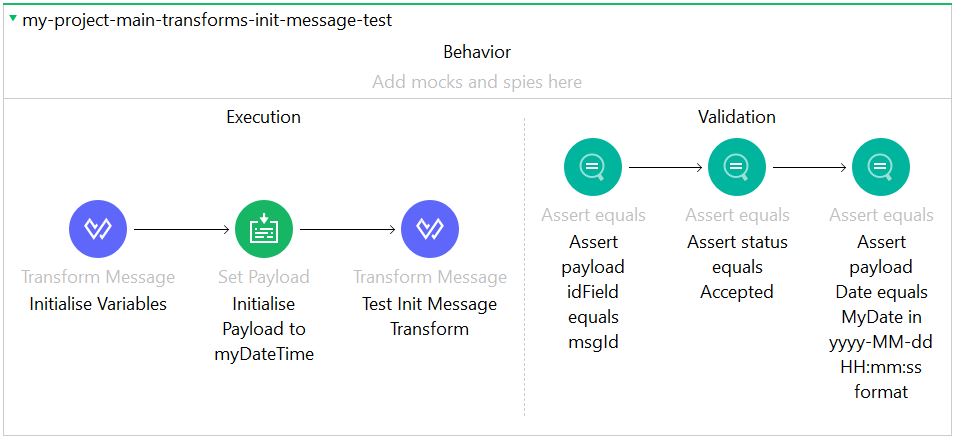
- Add another Transform before the Test Init Message Transform component and call it Initialise Varaibles
- Add the following two variables to the Transform
- myDateTime
- msgId
- Add the following Dataweave script to initialise myDateTime
%dw 2.0
output application/java
---
"2022-01-07T12:33:55Z" as DateTime
- Add the following Dataweave script to initialise msgId
%dw 2.0
output application/java
---
uuid()
- Add a Set Payload Component after your new Transform and call it initialise Payload to myDateTime
- Set the payload value to vars.myDateTime
Now you have simulated the basic requirements that are performed in the main flow itself; payload and variables are properly initialised for the script. However, you have these values (both the uuid and the timestamp) safely stored in variables within your Test. In other words, you have full control over the test.
Next, let’s add a few Asserts
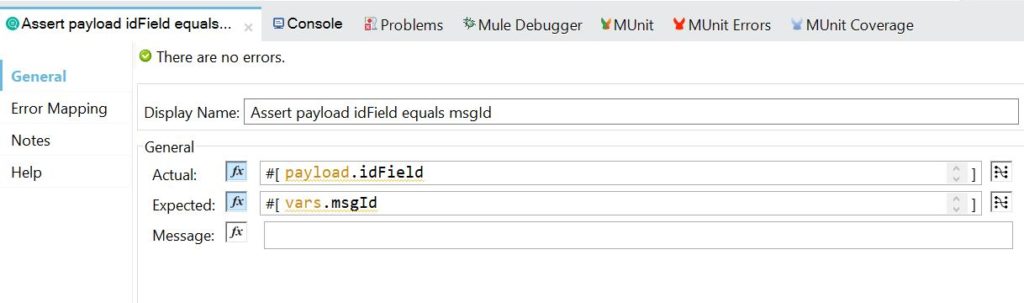
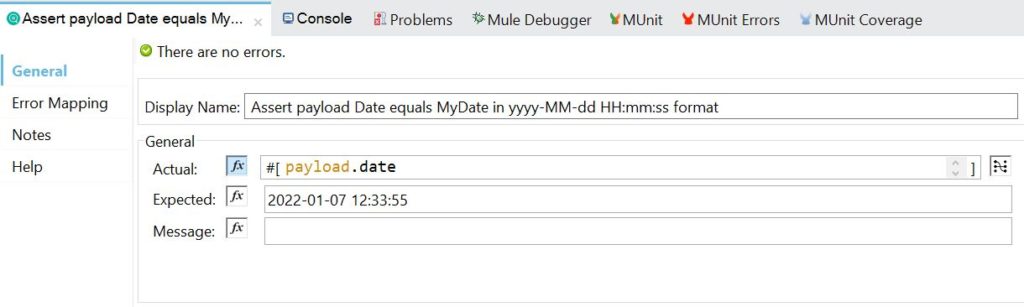
- Drag an assert onto your Test Validation pane and configure it as follows
- Drag a second assert onto your Test Validation pane and configure it as follows
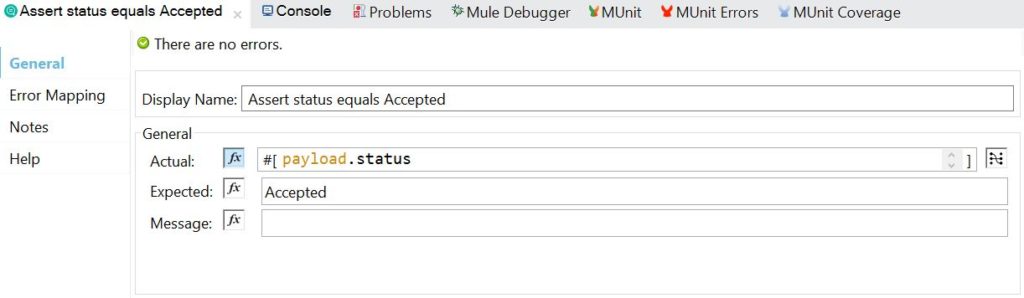
- Drag a third assert onto your Test Validation pane and configure it as follows
- Click Save
You should now be ready to run your test…
… and see that it fails!
This is a good thing. Until now, you were unable to run any proper tests against this component. This test reveals that the actual code does not produce the expected output format for the date field on the message.
Go back to the main flow and change your code there, as follows:
%dw 2.0
output application/java
---
{
idField: vars.msgId,
status: "Accepted",
date: payload as String {format:"yyy-MM-dd HH:mm:ss"}
}
Adding the HH:mm:ss to your format instruction should bring the code in line with your Test’s requirements. When you return to your Test suite and click on the Test Init Message Transform component, you should see your latest changes automatically reflected in the bottom right-hand pane, as it references the same externalised .dwl file.
Run the test again…
… and it passes!
By doing this for each of your complex Transforms, you can create a comprehensive Test Plan that covers all enventualities and helps you to create robust code.
Test-Driven Development (TDD) in Mule
If you have a deep burning desire to implement a full-blown TDD approach to your coding, you can achieve this using the above method.
When creating your initial Transforms, simply make every one of them static. No scripting or function calls. Each transform, should simply produce a static output of some sort. Once you have done that, you can write your tests and create your Assertions. Of course, these should all fail, according to the TDD rulebook.
Once that is done, you can then go back to each transform and implement the Dataweave code on your transforms to make your tests pass.
Purists might argue that even this does not amount to full-blown TDD but, still, it gets you pretty close.
Happy Testing!