In light of how prevalent OAuth 2.0 is as an authentication method, I found it surprising how few articles exist, explaining how to configure it in MuleSoft — especially in the context of an HTTP client.
The scenario
In this scenario, we have an HTTP Request in our flow. This makes a simple call to an external server that requires OAuth 2.0 as its authentication method.
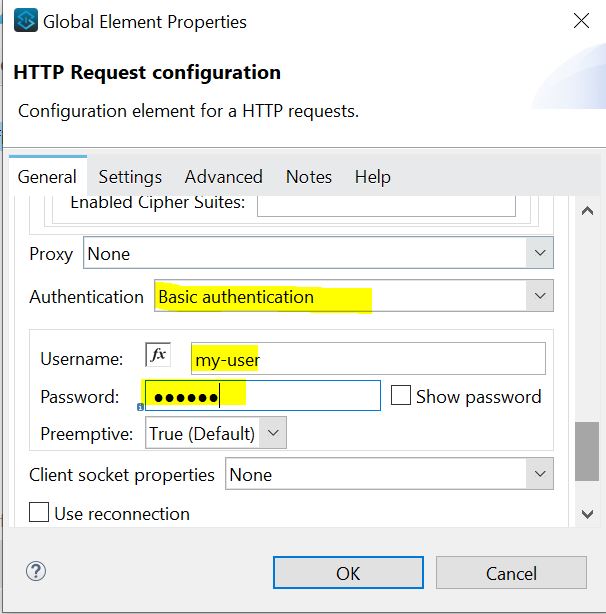
To configure Basic Authentication is a piece of cake; simply select Basic Authentication and enter your credentials as shown in the image below:
The Problem
OAuth, on the other hand, is not quite as intuitive. For starters, at time of writing, no OAuth-related options even appear in the Authentication drop-down list on my current version of Anypoint Studio.
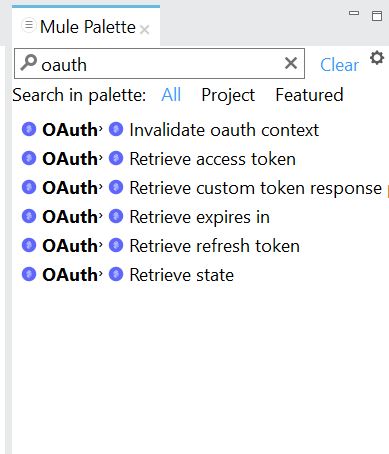
Whisper: To solve this problem, I simply searched for OAuth components in my Mule Palette (see below). I dragged Retrieve Access Token onto my flow, and saved the project. Then, I immediately deleted the component and saved the project again.
Having done that, the OAuth authentication options now appear as shown below

The Solution
I selected Client Credentials Grant Type. This opened a new Group of settings that allowed me to configure my OAuth 2.0 authentication.
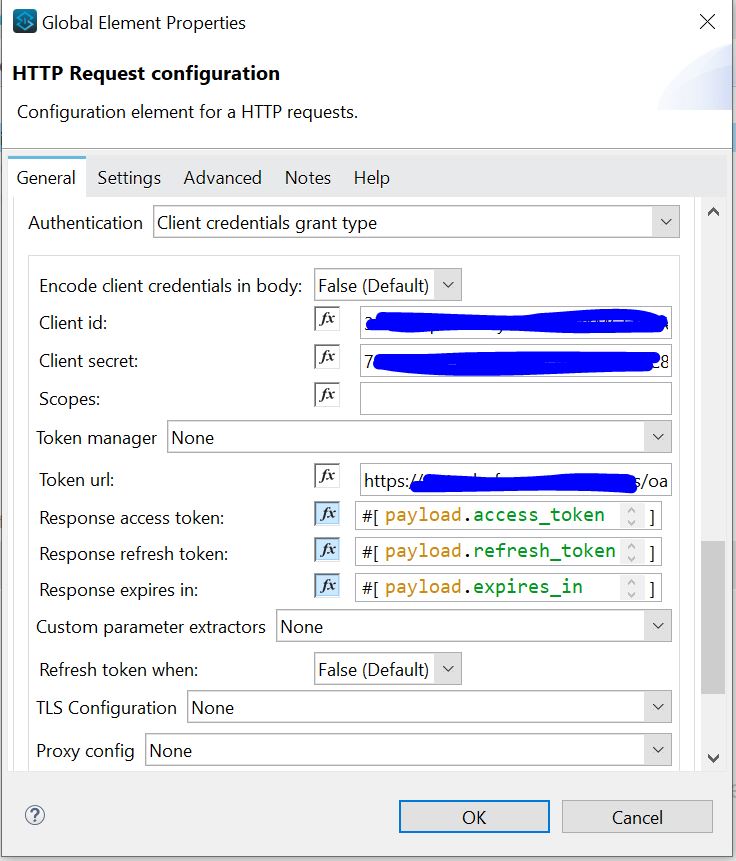
I entered the Client ID & Client Secret (provided by the remote server administrator).
Then I entered the Token URL (also provided by the remote server administrator).
I left all of the remaining values set to their default values, including:
- Response Access Token
- Response Refresh Token and
- Response Expires In
… as these are the payload values in which the remote server will place pertinent values required in your subsequent calls.
At this point, the Mule began to act silly — even stubborn. Having jumped through all of the required configuration hoops, I still got a list of errors.
I whispered…
… and the Mule delivered!
Turns out, all of the errors could be resolved by adding valid querystring parameters to my Token URL.
The first, “error”:”invalid_grant” was resolved by adding a grant_type=password query parameter. Seems this was a constraint imposed by the server’s OAuth. I tried grant_type=client_credentials which, while theoretically valid, was not supported on the given server.
The second, “error”:”invalid_client_id” was resolved by adding a client_id=<valid-client-id> query parameter.
The third, “error”:”invalid_client” was a little nondescript. However, the error description offered a little more insight, ‘invalid client credentials’. I resolved this by adding the client_secret=<valid-client-secret> query parameter.
Finally, I got another “error”:”invalid_grant” notification this time with the following error description, ‘authentication failure’. This is because, to authenticate on OAuth 2.0, you need to provide valid user credentials (NOTE: this is not the client_id & client_secret). After adding the following two additonal query parameters to the Token URL:
- username=<valid-username>
- password=<valid-pwd>
… the call worked as expected.
The final structure of my Token URL looked something like this:
https://remote.server.com/services/oauth2/token?grant_type=password&client_id=<valid-client-id>
&client_secret=<valid-client-secret>&username=<valid-username>&password=<valid-pwd>
Being forced to include Client ID & Client Secret fields in the querystring is vaguely annoying. Having already provided these values in the forms-based config, there appears to be no good reason why we should have to include them again in the Token URL.
As is turns out, the forms-based fields are a bit of a red herring. By way of experiment, I changed both of the forms field values to ‘xxxx’, and ran my application again. The call worked as before. In other words, these values appear not to be used at all by the Runtime engine. This is confusing to say the least — especially in light of the fact that both are required fields in the forms-based config.
Once again, we are faced with a choice. We can rage against the machine and declare our disdain for a feature that does not work as advertised — or we can act like true Mule Whisperers and configure our code in such a way that gets the job done. As always, when we whisper… the Mule delivers.
The last twist in the tail is configuring our HTTP Request component in such a way that we pass the token in the HTTP Request Headers.
The secret? Do nothing!
That’s right. No additional work is required. Having configured our OAuth 2.0 authentication correctly, the Mule does the rest. It calls the OAuth Token service, it fetches the token and injects it into the headers on the subsequent call.
NOTE: Some readers may wonder why we need both Client_ID and User credentials in this call. The answer is simple; Client and User are two different entities. In the OAuth context, Client (client_id & client_secret) represent the Client Application seeking authorisation. Conversely, User (user & password) represents the — well — user who is accessing the client application. The User passes their credentials to the Client Application, which in turn requests data from the provider using the User Credentials.